Recipes

A collection of my favourite recipes

Scrapbooks

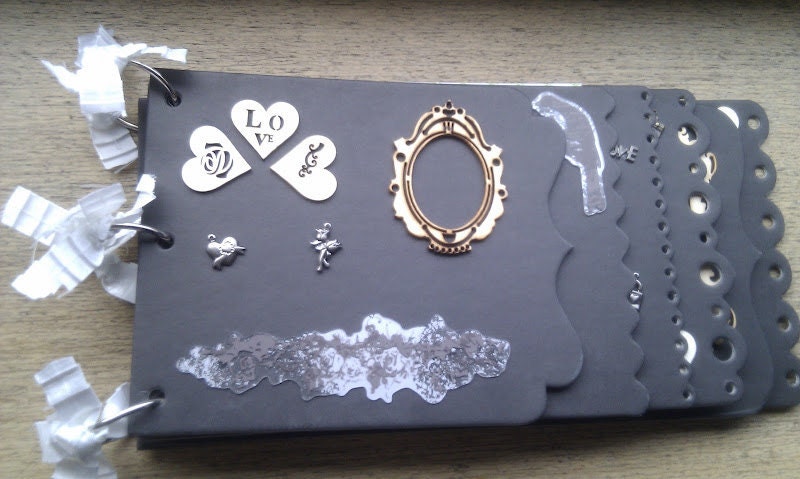
Sneak peeks at upcoming collections, and current releases, as well as custom designs and orders.

Inspirations

Inspiring pictures, photographs, songs and quotes.

Countries that I Love

Photographs of my travels and cultures which inspire my work

Cute Animalse

Everyone loves cute animals, right?

Tuesday 14 February 2012

Craft: Tea Cup Candles

Okay, so it's Valentine's Day, and most people are probably out spending time with the ones they love, whether that's your partner, your family, your friends or your pets.

Once you get back, though, here's an awesome craft for you to try. Not only is an easy way to spice up your home decor, but they make amazing gifts too - and if you try it in time, you can even give them for Mother's Day. It's the 18th March, by the way!


What You'll Need:
Teacups. Pick cute ones!
Wax pellets
Stearin
Medium wire wick. These should be lead-free
Candle dye.
Half a bamboo skewer
Two old pans. One should be big, and one smaller.
Trivet
Plastic jug

You'll need about one hour to do this! I used vintage-inspired teacups with pink candle wax - I love the feminine old-school feel!

Method:

Hold a piece of wire wick to the cup, and cut so that the wick is 5cm longer then the height of the cup.

Tie the wire wick piece to half a bamboo skewer, and place so that the longer piece of wick is in the cup.

Balance the skewer over the top of the cup.

Fill the larger pan with cold water. Place on a hob and slowly bring to the boil.

Place the wax pellets in a smaller saucepan, and place this inside the bigger saucepan.

Simmer on a low heat until the wax begins to melt. If you wish to make colored candles, add some dye now.

Add one tablespoon of stearin for every one pound of wax. This isn't essential, but produces a much higher-quality result.

Pour the completely melted wax into a plastic jug.

Pour the wax from the jug into teacups, and leave to cool. A well may form around the wick - if so, top up with more hot wax.

Once the candle has completely set, untie the wick from the skewer, and remove the skewer. Trim the wick to the right size.

There's plenty of cute teacup candles you can make, and if you make sets of two or four candles, they make fantastic presents.

You could even use personalized teacups!

I've found 1lb of wax makes approximately four candles, so if you're planning on making a larger set, you will need more wax.

Enjoy! And don't forget to share your pictures if you try this. I'd love to see your designs!


Recipe: Valentine's Day Chocolate Lava Cake

Chocolate Lava Cake is the perfect way to celebrate Valentine's Day. It's light, delicious and chocolatey, and simple enough to make even if you've been kept up all night by the sound of cards flooding through the letterbox (like me, of course.)


Ingredients:
2 sticks of unsalted butter
9 ounces bittersweet chocolate. Chop it up finely
3/4 teaspoon Cognac
3/4 teaspoon vanilla extract
3/4 cup granulated sugar
6 large eggs
A pinch of fine salt
1/4 cup of sifted flour
1/4 teaspoon of cream of tartar

For Serving, you might want:
Vanilla bean ice cream
Raspberry coulis
Powdered sugar

How To Make It:

Heat the oven to 190 degrees Celsius.

Use 1 tablespoon of butter to coat 8 6 ounce ramekins.

Cut eight circles out of parchment paper, and place in the bottom of the ramekins. Then cut eight rectangles out. Place each one end to end, to make a circle, and place inside a ramekin.

Place finely chopped chocolate into a heatproof bowl.

Melt the remaining butter on a medium heat, stirring regularly. Remove from heat and pour the butter over the chocolate. Whisk together.

Add the vanilla extract and cognac to the butter and chocolate, and whisk again.

In a seperate bowl, mix together sugar and the yolks from 6 large eggs. Whisk until the mixture turns a lighter color, and the sugar is almost dissolved.

Pour the sugar and egg mixture over the chocolate, and fold in using a spatula.

In another seperate bowl, whisk the egg whites to form medium-stiff peaks. Add the cream of tartar.

Fold in 1/3 of the egg white mixture, and fold in to the chocolate.

Add 1/3 of the flour, and fold in again.

Repeat until all of the flour and egg white mixture are folded into the chocolate. Do not overfold - the mixture will still be streaky.

Fill the ramekins with the mixture until they are about 2/3 full.

Bake for 10 to 12 minutes, until the outside is set but the middle is still gooey.

Place the ramekins on a wire rack and allow to cool for five minutes.

Dust each cake with powdered sugar and serve with coulis or ice cream.


Delicious! Enjoy Valentines Day - and check back later for some Valentines-inspired crafts.

Tuesday's To-Do List

After a busy day, I'm finally starting to unwind. I've got to prepare for new clients tomorrow, but I'm somehow sat here at half past midnight posting cute pictures on Tumblr...it's addictive!

If you want to see, check me out at www.cajadelamemoria.tumblr.com - It's mainly a collection of pictures and inspirations which prompt me to write here. Plus some banter with friends and fellow workers!


It's definitely time to go to sleep, though, before I end up like this monkey - cute as it is!

Tomorrow I'll be buying supplies, preparing for new clients and going on a train journey - and no doubt doing some baking and posting my finds and thoughts, too.

Don't be afraid to let me know what you're doing - and sweet dreams!

Monday 13 February 2012

Lunch Time Recipe: Tagliatelle

Looking for some lunchtime inspiration?

Tagliatelle is a classic dish, which isn't eaten often enough in my opinion. Plus, something tangy and tomatoe-y is great for sprucing you up when it gets to lunchtime!


For this recipe you'll need:
2 cans of diced tomatoes, drained
1 jar of tomato and garlic caviar (See note under ingredients)
10 cherry tomatoes, cut in half
Fresh tagliatelle
1 tbsp olive oil
1 cup ricotta
Roquette
Parmesan

**If you fancy trying this recipe but haven't got caviar, try cooking tomato paste with olive oil, garlic, basil and a small amount of water. Taste regularly, and you can't go far wrong!**

Cook your fresh tagliatelle, according to the packet. Leave to cool.

Cook tomatoes in the olive oil until well mixed.

Pour in 1 jar of tomato caviar, and cook for 2 minutes, mixing regularly.

Add the ricotta and cook for five minutes.

Remove from the heat and add pancetta and cherry tomatoes.

Pour the tomato mixture over the cooked tagliatelle, and sprinkle parmesan on top to taste. You can also add roquette!

This makes a gorgeous evening meal too, and tastes divine with wine...


Recipe! - Chocolate Profiteroles

I'm currently working on recipe books, so I've been looking over some retro inspired recipes, and I've found some gorgeous ones...this has to be one of my favourites!


It takes about 15 minutes to make 25 profiteroles (and 50 minutes cooking time!)

Ingredients:
100g unsalted butter
150g plain flour
1tsp caster sugar
4 medium eggs
300ml double cream

For the chocolate sauce:
250g dark chocolate. 70% cocoa solids gives the best results!
3tsp golden syrup
2tbsp double cream
50g unsalted butter

Method:

First, prepare the choux bun ingredients. Beat together four medium eggs in one bowl, and whip 300ml of double cream in another.

Lightly grease two baking trays, and turn the oven to 200C, gas mark 6.

Put 100g butter and 250ml of water into a saucepan, and bring to the boil. Remove from the heat.

Pour 150g flour, 1/2 tsp salt and 1tsp sugar into the hot mixture.

Beat until the mixture becomes a ball of dough, and detaches from the side of the pan.

Beat in 1/4 of the egg mixture. Beat well, and add another 1/4, until the egg is fully mixed in.

Use two teaspoons to shape pieces of dough into walnut sized balls. If you like round profiteroles, smooth the balls with the spoons. For a walnut appearance, leave the top of the ball pointed.

Bake in the over for 45 minutes. Check regularly after 30 minutes to ensure you don't overcook them - they are ready when they appear golden, crispy and puffed.

Place the profiteroles onto a wire rack, and use a sharp knife to cut half way through each profiterole. This lets the steam out and prevents them from becoming too chewy.

**You can freeze profiteroles at this point to use later. If you do this, put them back in the over for a few minutes to ensure they are crispy, and then freeze**

While they cool, make the chocolate sauce. Put a pan of boiling water on the hob, and place 250g dark chocolate in a bowl. Melt the chocolate over the boiling water.

Mix in the butter, golden syrup and cream, a little at a time.

Remove the mixture from the heat.

Whip cream, and pipe a blob into each profiterole. Pile the profiteroles into a pile once they have all been filled, and pour chocolate sauce over them.

Serve!
___________________________________________________________________________________


I got plenty of compliments on these when I served them for dessert yesterday - I even used some white chocolate as a sauce, to see if this was just as nice. It was!

Have you got a retro recipe? I'd love to try it!

Sunday 12 February 2012

Gorgeous Baby Mobile!

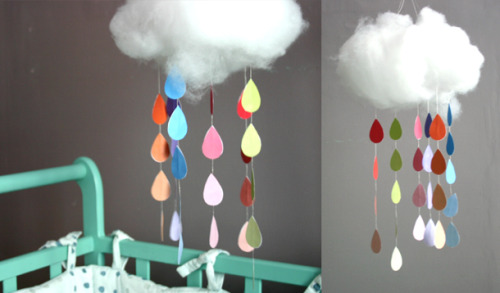
I'm currently designing new lines, which gives me plenty of time to try out new crafts and ideas too. I recently saw these gorgeous images, and couldn't help but make it...even though I have no baby!


To make it, you'll need:


15cm polystyrene circular tube
Silver thread or fishing wire
Fleece/Cotton Batting
Plenty of coloured papers
Pins
Pencils
Scissors
Glue


Method:


Cut out 40cm of wire or thread, and repeat until you've got plenty of pieces.


Tie four around the polystyrene circle, equal distances apart. These will be used to hang the mobile.


Tie the rest around the circle. It doesn't matter how these are tied around, they are for decorating!


Cut raindrop shapes out from different colours of paper. You'll need two of each colour to make one raindrop. 


Lie out the raindrops as you'd like them to appear on one piece of wire. Apply glue to one side of each raindrop, and lie the wire on top of the glue. Put the second colour raindrop on top, to secure the wire in the middle.


Use different colours and numbers of raindrops on each wire, to give a varied effect.


Braid the four threads which are for hanging the mobile, to make a thicker, stronger hanger.


Pull apart some cotton batting or fleece, and pin random sections around the polystyrene to hide the threads and give a fluffy cloud look. 


Let the glue dry, and suspend the mobile. For safety's sake, hang it well out of reach of children.
__________________________________________________________________


It's so beautiful! Pinks and purples give a feminine vibe perfect for bedrooms, or use bright primary colours for something which is bound to catch baby's attention.


I'm not sure where the pattern came from originally, but I've heard that there is something similar on Lait Fraise, so credit to them for the design. It's gorgeous!

Inspirations!


It's been minus three today, and with the snow, frost and wind, it would have been a lovely day to have a fire!
Instead, I've been finding inspiration, and buying supplies for my next projects. It's strange the things that inspire you. Especially when it's so gloomy outside!
I love lights. The city lights, fairy lights, candles...today has been pretty dark all day, but when the lights come on, it feels like a different world.
 Spring Weddings!
It's a bit strange to be thinking of the springtime while its so cold and frosty, but now that its February it's only a matter of time until the flowers start to bloom, and the days get warmer!
I love the Spring, and I'm not the only one. Spring weddings are hugely popular, and will definately feature in my future projects. There is some stunning Spring Wedding inspiration to be had, too.

I love the strong contrast in wedding themes, too. On the one side there is pretty flowers, pastel colours and scruffy updos - a romantic feel that is all about the pretty season. On the other, dark lipstick, strong contrasts and a vintage feel which is just stunning. I don't know how I'd choose between them!
Food
Now that the excesses of Christmas are forgotten, and Valentines Day and Easter approach, food is a big topic. From cupcakes (which I've been baking for weeks) to sweets and even three-course meals (tonight we've got roast potatoes, yorkshire puds and beef. Yummy!) its a topic that is on everyone's mind.
I'm definately planning something incorporating the colors and textures of sweets with the art of cake decorating - and afternoon tea is inspiring at the moment, too. 

What colors and trends are you loving? Perhaps you'll inspire my next design!

Dreamy Red Velvet Cupcakes!


I don't know about you, but I am a big lover of baking - and cupcakes! One of my absolute favourites has to be red velvet. I love the deep colour, and the flavour is just unbeatable...and the satisfaction of serving a slice of red cake to an unsuspecting guest is quite amusing, too.
Here's my favourite red velvet cupcake recipe. Which flavour do you love?
Ingredients
60g unsalted butter. Leave this out, until its room temperature.
150g caster sugar
1 egg
10g cocoa powder
20ml red food colouring. To get that vivid red, opt for Dr Oetker - avoid natural red shades, which won't be as bright.
1/2tsp of vanilla extract
120ml buttermilk
150mg plain flour
1/2tsp bicarbonate of soda
1/2tsp salt
1 1/2tsp white wine vinegar

For the frosting:
125g cold cream cheese
300g icing sugar, sifted.
50g unsalted butter - again, leave it out until its room temperature.

Method:
Turn the oven to 170 degrees C, or gas mark 3.
Put butter and sugar into an electric mixer or bowl, and beat until the mixture is light and fluffy. 
Add in the egg, and beat again until you have a well-blended mixture.
Mix together cocoa butter, red food coloring and vanilla extract in a seperate bowl. This should blend to form a thick, dark paste.
Add the two mixtures together, bit by bit, mixing well. The coloring should be even all the way through.
Pour in half of the buttermilk, and blend. 
Add half of the flour, and mix again.
Add the remaining buttermilk, mix, then add the remaining flour and mix. This ensures the mixture gets plenty of air, and is well blended.
Add the salt, bicarbonate of soda and vinegar to the mixture. It should be smooth and even. 
Give a final mix - just to be safe!
Spoon the mixture into cake cases. This recipe should fill about 12 cases until they are 2/3 full.
Put the cakes in the oven. The mixture usually cooks in about 25 minutes - the sponge should bounce back when pressed. Then you know they are ready.
Take the cupcakes out of the over, and place onto a wire rack to allow them to cool. 
While they cool, you can begin making the topping. 
Beat together the icing sugar and butter to form a smooth mixture. 
Add in the cream cheese, and beat well.
Mix for around five minutes. It needs plenty of mixing, although you don't want to go crazy - stop if the mixture appears to be turning runny.
When the cupcakes are completely cool, spoon the cream cheese frosting onto the top. 
Allow to set for a few minutes, and serve!
Enjoy with a yummy milkshake. Mmmm. I'm off to make some cakes!
xoxo

Photographing Animals


Today, I'm photographing and listing a pet-themed scrapbook, featuring some supercute buttons! Here's a sneak-peak...
So in the spirit of recording your pet's favourite moments and memories, here's some tips for photographing animals.
1. It's All In The Eyes
Make sure your pet's eyes are in focus when you take the shot. If you miss the eyes, the photograph won't be very good, and blurred eyes are difficult to fix using photo editing software. Using the eyes as a focus point, by making sure they appear in the middle of the photograph and are clear, will help you take better photographs.
2. Use Both Your Eyes
Many people believe they will achieve better photographs if they close one eye to take the shot, but usually this isn't the case. You can catch natural behaviours, such as your dogs chasing each other or birds flying off, if you keep both eyes open and watch what is happening - and more importantly, what is about to happen.
3. Pimp Your Camera
Using a tripod will prevent your camera from shaking, and blurring photgraphs. You can take this one step further by also using a shutter release cable, which stops you needing to touch the camera at all. Just set it up, wait for the perfect photo, and touch the cable. Natural, blur-free photos.
3. Anticipation Is Key
Look out for signs that your pet, or a wild animal you are watching, is going to do something really cute. Whether it's going to eat, coming over to you or playing chase, the best photos are always the ones which were anticipated.
4. Change Your Shutter Speed
Try different methods of taking photographs. For a still image, change your speed to 1/500 or faster, so you can catch the action. If you want to catch movement, such as an animal running for example, change your speed to 1/4 or 1/8 and pan the camera with the animal.
5. Know When To Use Your Flash
Whilst your flashes primary function is to provide lighting when there isn't any, that isn't all it can be used for. Using the flash in the daylight can illuminate shadows and provide more detail to your image. Be aware of where you are photographing though - using the flash is likely to ruin the photo if you are taking it through glass.
6. Practise!
Take photos all the time. Whilst they won't all be candidates for your scrapbook, you'll get some great shots, and learn about your camera at the same time. You might also find that the most unusual photoshoots are the ones which capture your heart, and create the pictures which mean the most.
 
A scrapbook can be the perfect way to show off your favourite photos, whether they are of your pets, wildlife or zoo animals, and make long-lasting memory books too. 
What's your favourite animal picture? Share your links!
xoxo

Welcome :)


Welcome to the Caja De La Memoria blog!
Here is the place to find out all about my favourite supplies, new ranges and see sneak peaks of upcoming products - as well as general information on all areas of life.
As an introduction, my name is Kati, and I am the creator of all Caja De La Memoria scrapbooks. I've been scrapbooking for several years, and after great success locally, am now offering my products to an International audience.
After spending the days dog-training, I love to relax with a pile of papers, buttons, ribbons, embellishments...There's just something about putting together a design that will help people to remember their absolute favourite memories.

So, stay tuned for more news and information, and don't be afraid to comment and say hi, or suggest your own product themes!
xoxo

Twitter Delicious Facebook Digg Stumbleupon Favorites More